User Codes
Astrophysics
Athena (explicit, uniform grid MHD code)
Athena is a straightforward C code which doesn't use a lot of libraries so it is pretty straightforward to build and compile on new machines.
It encapsulates its compiler flags, etc in an Makeoptions.in file which is then processed by configure. I've used the following additions to Makeoptions.in on TCS and GPC:
<source lang="sh"> ifeq ($(MACHINE),scinettcs)
 CC = mpcc_r
 LDR = mpcc_r
 OPT = -O5 -q64 -qarch=pwr6 -qtune=pwr6 -qcache=auto -qlargepage -qstrict
 MPIINC =
 MPILIB =
 CFLAGS = $(OPT)
 LIB = -ldl -lm
else ifeq ($(MACHINE),scinetgpc)
 CC = mpicc
 LDR = mpicc
 OPT = -O3
 MPIINC =
 MPILIB =
 CFLAGS = $(OPT)
 LIB = -lm
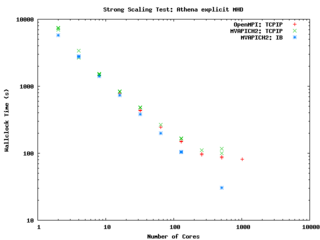
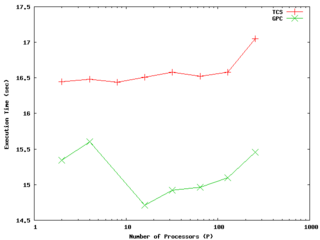
else ... endif endif </source> It performs quite well on the GPC, scaling extremely well even on a strong scaling test out to about 256 cores (32 nodes) on Gigabit ethernet, and performing beautifully on InfiniBand out to 512 cores (64 nodes).
-- ljdursi 19:20, 13 August 2009 (UTC)
FLASH3 (Adaptive Mesh reactive hydrodynamics; explict hydro/MHD)
FLASH encapsulates its machine-dependant information in the FLASH3/sites directory. For the GPC, you'll have to
module load intel
module load openmpi
module load hdf5/183-v16-openmpi
and with that, the following file (sites/scinetgpc/Makefile.h) works for me: <source lang="sh">
- Must do module load hdf5/183-v16-openmpi
HDF5_PATH = ${SCINET_HDF5_BASE} ZLIB_PATH = /usr/local
- ----------------------------------------------------------------------------
- Compiler and linker commands
- We use the f90 compiler as the linker, so some C libraries may explicitly
- need to be added into the link line.
- ----------------------------------------------------------------------------
- modules will put the right mpi in our path
FCOMP = mpif77 CCOMP = mpicc CPPCOMP = mpiCC LINK = mpif77
- ----------------------------------------------------------------------------
- Compilation flags
- Three sets of compilation/linking flags are defined: one for optimized
- code, one for testing, and one for debugging. The default is to use the
- _OPT version. Specifying -debug to setup will pick the _DEBUG version,
- these should enable bounds checking. Specifying -test is used for
- flash_test, and is set for quick code generation, and (sometimes)
- profiling. The Makefile generated by setup will assign the generic token
- (ex. FFLAGS) to the proper set of flags (ex. FFLAGS_OPT).
- ----------------------------------------------------------------------------
FFLAGS_OPT = -c -r8 -i4 -O3 -xSSE4.2 FFLAGS_DEBUG = -c -g -r8 -i4 -O0 FFLAGS_TEST = -c -r8 -i4
- if we are using HDF5, we need to specify the path to the include files
CFLAGS_HDF5 = -I${HDF5_PATH}/include
CFLAGS_OPT = -c -O3 -xSSE4.2 CFLAGS_TEST = -c -O2 CFLAGS_DEBUG = -c -g
MDEFS =
.SUFFIXES: .o .c .f .F .h .fh .F90 .f90
- ----------------------------------------------------------------------------
- Linker flags
- There is a seperate version of the linker flags for each of the _OPT,
- _DEBUG, and _TEST cases.
- ----------------------------------------------------------------------------
LFLAGS_OPT = -o LFLAGS_TEST = -o LFLAGS_DEBUG = -g -o
MACHOBJ =
MV = mv -f
AR = ar -r
RM = rm -f
CD = cd
RL = ranlib
ECHO = echo
</source>
-- ljdursi 22:11, 13 August 2009 (UTC)
Aeronautics
Chemistry
GAMESS (US)
The GAMESS version January 12, 2009 R3 was built using the Intel v11.1 compilers and v3.2.2 MPI library, according to the instructions in http://software.intel.com/en-us/articles/building-gamess-with-intel-compilers-intel-mkl-and-intel-mpi-on-linux/
The required build scripts - comp, compall, lked - and run script - rungms - were modified to account for our own installation. In order to build GAMESS one first must ensure that the intel and intelmpi modules are loaded ("module load intel intelmpi"). This applies to running GAMESS as well. The module "gamess" must also be loaded in order to run GAMESS ("module load gamess").
The modified scripts are in the file /scinet/gpc/src/gamess-on-scinet.tar.gz
Running GAMESS
- Make sure the directory /scratch/$USER/gamess-scratch exists (the $SCINET_RUNGMS script will create it if it does not exist)
- Make sure the modules: intel, intelmpi, gamess are loaded (in your .bashrc: "module load intel intelmpi gamess").
- Create a torque script to run GAMESS. Here is an example:
- The GAMESS executable is in $SCINET_GAMESS_HOME/gamess.00.x - The rungms script is in $SCINET_GAMESS_HOME/rungms (actually it is $SCINET_RUNGMS)
- For IB multinode runs, use the $SCINET_RUNGMS_IB script
- The rungms script takes 4 arguments: input file, executable number, number of compute processes, processors per node
For example, in order to run with the input file /scratch/$USER/gamesstest01, on 8 cpus, and the default version (00) of the executable on a machine with 8 cores:
  # load the gamess module in .bashrc
  module load gamess
  # run the program
  $SCINET_RUNGMS /scratch/$USER/gamesstest01 00 8 8
Here is a sample torque script for running a GAMESS calculation, on a single 8-core node:
<source lang="bash">
- !/bin/bash
- PBS -l nodes=1:ppn=8,walltime=48:00:00,os=centos53computeA
- PBS -N gamessjob
- To submit type: qsub gms.sh
- If not an interactive job (i.e. -I), then cd into the directory where
- I typed qsub.
if [ "$PBS_ENVIRONMENT" != "PBS_INTERACTIVE" ]; then
  if [ -n "$PBS_O_WORKDIR" ]; then
    cd $PBS_O_WORKDIR
  fi
fi
- the input file is typically named something like "gamesjob.inp"
- so the script will be run like "$SCINET_RUNGMS gamessjob 00 8 8"
- load the gamess module if not in .bashrc already
- actually, it MUST be in .bashrc
- module load gamess
- run the program
$SCINET_RUNGMS gamessjob 00 8 8 </source>
Here is a similar script, but this one uses 2 InfiniBand-connected nodes, and runs the appropriate $SCINET_RUNGMS_IB script to actually run the job:
<source lang="bash">
- !/bin/bash
- PBS -l nodes=2:ib:ppn=8,walltime=48:00:00,os=centos53computeA
- PBS -N gamessjob
- To submit type: qsub gmsib.sh
- If not an interactive job (i.e. -I), then cd into the directory where
- I typed qsub.
if [ "$PBS_ENVIRONMENT" != "PBS_INTERACTIVE" ]; then
  if [ -n "$PBS_O_WORKDIR" ]; then
    cd $PBS_O_WORKDIR
  fi
fi
- the input file is typically named something like "gamesjob.inp"
- so the script will be run like "$SCINET_RUNGMS gamessjob 00 8 8"
- load the gamess module if not in .bashrc already
- actually, it MUST be in .bashrc
- module load gamess
- This script requests InfiniBand-connected nodes (:ib above)
- so it must run with the IB version of the rungms script,
- $SCINET_RUNGMS_IB
$SCINET_RUNGMS_IB gamessjob 00 16 8 </source>
-- dgruner 5 October 2009
Tips from the Fekl Lab
Through trial and error, we have found a few useful things that we would like to share:
1. Two very useful, open-source programs for visualization of output files from GAMESS(US) and for generation of input files are MacMolPltand Avogadro. The are available for UNIX/LINUX, Windows and Mac based machines, HOWEVER: any input files that we have generated with these programs on a Windows-based machine do not run. We don't know why.
2. WinSCP is a very useful tool that has a graphical user interface for moving files from a local machine to SCINET and vice versa. It also has text editing capabilities.
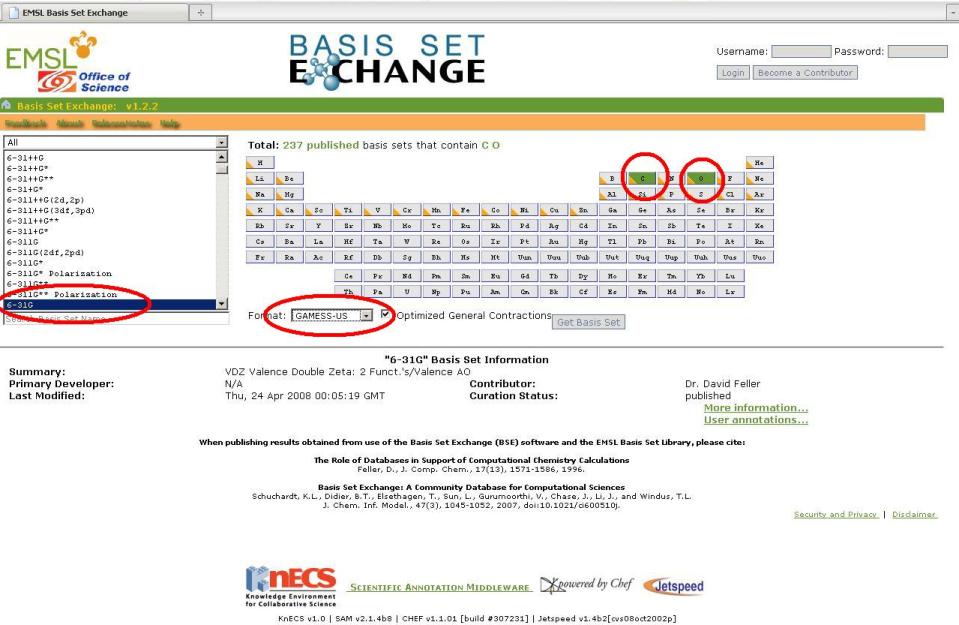
3. The ESML Basis Set Exchange is an excellent source for custom basis set or effective core potential parameter. Make sure that you specify "Gamess-US" in the format drop-down box.
Anatomy of a GAMESS(US) Input File
coming soon...
Using Effective Core Potentials in GAMESS(US)
For many metal containing compounds, it is very convenient and time saving to use an effective core potential (ECP) for the core metal electrons, as they are usually not important to the reactivity of the complex or the geometry around the metal. Since GAMESS(US) has a limited number of built-in ECPs, one may want to make GAMESS(US) read an external file that contains the ECP data using the "EXTFIL" keyword in the $GBASIS command line of the input file. In addition, to make GAMESS(US) use this external file, one must copy the "rungms" file and modify it accordingly. The following is a list of instructions with commands that will work from a terminal. One could also use WinSCP to do all of this with a GUI rather than a TUI.
Modifiying rungms to Use Custom Basis Set File
1. Copy "rungms" from /scinet/gpc/Applications/gamess to one's own /scratch/$USER/ directory:
cp /scinet/gpc/Applications/gamess/rungms /scratch/$USER/
2. Change to the scratch directory and check to see if "rungms" has copied successfully.
cd /scratch/$USER
ls
3. Edit line 147 of the vi.
vi rungms
Move the cursor down to line 147 using the arrow keys. It should say "setenv EXTBAS /dev/null". Using the arrow keys, move the cursor to the first "/" and then hit "i" to insert text. Put the path to your external basis file here. For example, /scratch/$USER/basisset. Then hit "escape". To save the changes and exit vi, type ":" and you should see a colon appear at the bottom of the window. Type "wq" (which should appear at the bottom of the window next to the colon) and then hit enter. Now you are done with vi.
Creating a Custom Basis Set File
1. To create a custom basis set file, you need create a new text document. Our group's common practice is to comment out the first line of this file by inserting an exclamation mark (!) followed by noting the specific basis sets and ECPs that are going to be used for each of the atoms. Let us the molecule Mo(CO)6, Molybdenum hexacarbonyl, as an example. Below is the first line of the the external file, which we will call "CUSTOMMO" (NOTE: you can use any name for the external file that suits you, as long as it has no spaces and is 8 characters or less).
! 6-31G on C and O and LANL2D2 ECP on Mo
2. The next step is to visit the EMSL Basis Set exchange and select C and O from the periodic table. Then, on the left of the page, select "6-31G" as the basis set. Finally, make sure the output is in GAMESS(US) format using the drop-down menu and then click "get basis set".
3. A new window should appear with text in it. For our example case, the text looks like this:
!  6-31G  EMSL  Basis Set Exchange Library   10/13/09 11:12 AM
! Elements                             References
! --------                             ----------
! H - He: W.J. Hehre, R. Ditchfield and J.A. Pople, J. Chem. Phys. 56,
! Li - Ne: 2257 (1972).  Note: Li and B come from J.D. Dill and J.A.
! Pople, J. Chem. Phys. 62, 2921 (1975).
! Na - Ar: M.M. Francl, W.J. Petro, W.J. Hehre, J.S. Binkley, M.S. Gordon,
! D.J. DeFrees and J.A. Pople, J. Chem. Phys. 77, 3654 (1982)
! K  - Zn: V. Rassolov, J.A. Pople, M. Ratner and T.L. Windus, J. Chem. Phys.
! 109, 1223 (1998)
! Note: He and Ne are unpublished basis sets taken from the Gaussian
! program
!
$DATA

CARBON
S   6
  1   3047.5249000              0.0018347
  2    457.3695100              0.0140373
  3    103.9486900              0.0688426
  4     29.2101550              0.2321844
  5      9.2866630              0.4679413
  6      3.1639270              0.3623120
L   3
  1      7.8682724             -0.1193324              0.0689991
  2      1.8812885             -0.1608542              0.3164240
  3      0.5442493              1.1434564              0.7443083
L   1
  1      0.1687144              1.0000000              1.0000000

OXYGEN
S   6
  1   5484.6717000              0.0018311
  2    825.2349500              0.0139501
  3    188.0469600              0.0684451
  4     52.9645000              0.2327143
  5     16.8975700              0.4701930
  6      5.7996353              0.3585209
L   3
  1     15.5396160             -0.1107775              0.0708743
  2      3.5999336             -0.1480263              0.3397528
  3      1.0137618              1.1307670              0.7271586
L   1
  1      0.2700058              1.0000000              1.0000000
$END
3. Now, copy and paste the text between the $DATA and $END headings onto our external text file, CUSTOMMO. We also need to change the change the name of each element to it symbol in the periodic table. Finally, we need to add the name of the external file next to the element symbol, separated by one space. Note that there should be a blank line separating the basis set information and the first, commented out line. The CUSTOMMO should look like this:
! 6-31G on C and O and LANL2D2 ECP on Mo

C CUSTOMMO
S   6
  1   3047.5249000              0.0018347
  2    457.3695100              0.0140373
  3    103.9486900              0.0688426
  4     29.2101550              0.2321844
  5      9.2866630              0.4679413
  6      3.1639270              0.3623120
L   3
  1      7.8682724             -0.1193324              0.0689991
  2      1.8812885             -0.1608542              0.3164240
  3      0.5442493              1.1434564              0.7443083
L   1
  1      0.1687144              1.0000000              1.0000000

O CUSTOMMO
S   6
  1   5484.6717000              0.0018311
  2    825.2349500              0.0139501
  3    188.0469600              0.0684451
  4     52.9645000              0.2327143
  5     16.8975700              0.4701930
  6      5.7996353              0.3585209
L   3
  1     15.5396160             -0.1107775              0.0708743
  2      3.5999336             -0.1480263              0.3397528
  3      1.0137618              1.1307670              0.7271586
L   1
  1      0.2700058              1.0000000              1.0000000
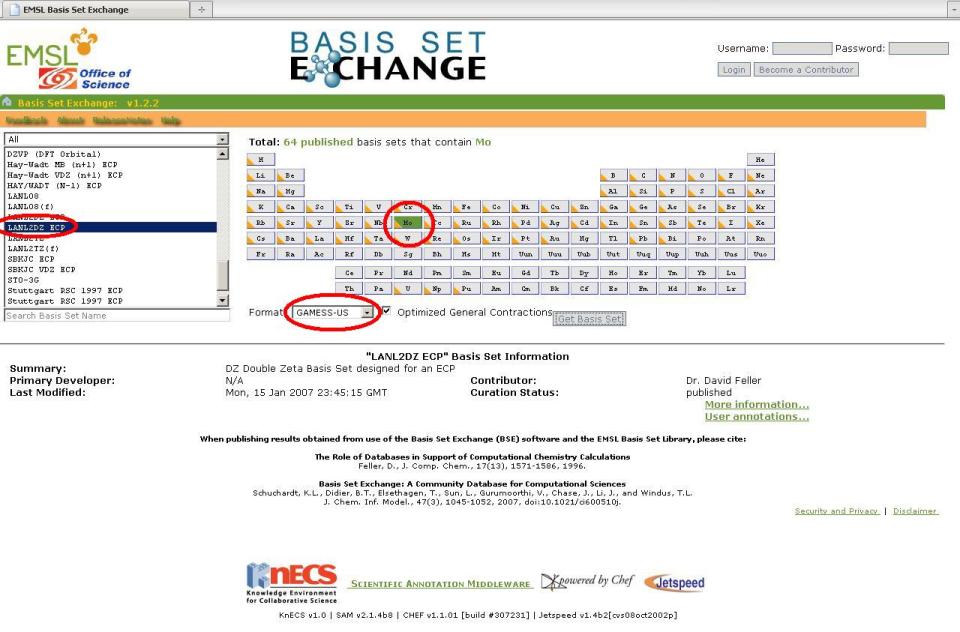
4. Repeat Step 3 above but choose Mo and select the LANL2DZ ECP instead. A new window will pop up with the basis set information as well as the ECP data we need, since we specified the LANL2DZ ECP. The ECP data is not inserted into the external file, rather it is placed into the input file itself.
5. After copying the molybdenum basis set information, your fiished external basis set file should look like this:
! 6-31G on C and O and LANL2D2 ECP on Mo

C CUSTOMMO
S   6
  1   3047.5249000              0.0018347
  2    457.3695100              0.0140373
  3    103.9486900              0.0688426
  4     29.2101550              0.2321844
  5      9.2866630              0.4679413
  6      3.1639270              0.3623120
L   3
  1      7.8682724             -0.1193324              0.0689991
  2      1.8812885             -0.1608542              0.3164240
  3      0.5442493              1.1434564              0.7443083
L   1
  1      0.1687144              1.0000000              1.0000000

O CUSTOMMO
S   6
  1   5484.6717000              0.0018311
  2    825.2349500              0.0139501
  3    188.0469600              0.0684451
  4     52.9645000              0.2327143
  5     16.8975700              0.4701930
  6      5.7996353              0.3585209
L   3
  1     15.5396160             -0.1107775              0.0708743
  2      3.5999336             -0.1480263              0.3397528
  3      1.0137618              1.1307670              0.7271586
L   1
  1      0.2700058              1.0000000              1.0000000

Mo CUSTOMO
S   3
  1      2.3610000             -0.9121760
  2      1.3090000              1.1477453
  3      0.4500000              0.6097109
S   4
  1      2.3610000              0.8139259
  2      1.3090000             -1.1360084
  3      0.4500000             -1.1611592
  4      0.1681000              1.0064786
S   1
  1      0.0423000              1.0000000
P   3
  1      4.8950000             -0.0908258
  2      1.0440000              0.7042899
  3      0.3877000              0.3973179
P   2
  1      0.4995000             -0.1081945
  2      0.0780000              1.0368093
P   1
  1      0.0247000              1.0000000
D   3
  1      2.9930000              0.0527063
  2      1.0630000              0.5003907
  3      0.3721000              0.5794024
D   1
  1      0.1178000              1.0000000
-- mzd 13 October 2009
Climate Modelling
Medicine/Bio
High Energy Physics
Structural Biology
Molecular simulation of proteins, lipids, carbohydrates, and other biologically relevant molecules.
Molecular Dynamics (MD) simulation
GROMACS
Please refer to the GROMACS page
NAMD
NAMD is one of the better scaling MD packages out there. With sufficiently large systems, it is able to scale to hundreds or thousands of cores on Scinet. Below are details for compiling and running NAMD on Scinet.
More information regarding performance and different compile options coming soon...
Compiling NAMD for GPC
Ensure the proper compiler/mpi modules are loaded. <source lang="sh"> module load intel module load openmpi/1.3.3-intel-v11.0-ofed </source>
Compile Charm++ and NAMD <source lang="sh">
- Unpack source files and get required support libraries
tar -xzf NAMD_2.7b1_Source.tar.gz cd NAMD_2.7b1_Source tar -xf charm-6.1.tar wget http://www.ks.uiuc.edu/Research/namd/libraries/fftw-linux-x86_64.tar.gz wget http://www.ks.uiuc.edu/Research/namd/libraries/tcl-linux-x86_64.tar.gz tar -xzf fftw-linux-x86_64.tar.gz; mv linux-x86_64 fftw tar -xzf tcl-linux-x86_64.tar.gz; mv linux-x86_64 tcl
- Compile Charm++
cd charm-6.1 ./build charm++ mpi-linux-x86_64 icc --basedir /scinet/gpc/mpi/openmpi/1.3.3-intel-v11.0-ofed/ --no-shared -O -DCMK_OPTIMIZE=1 cd ..
- Compile NAMD.
- Edit arch/Linux-x86_64-icc.arch and add "-lmpi" to the end of the CXXOPTS and COPTS line.
- Make a builds directory if you want different versions of NAMD compiled at the same time.
mkdir builds ./config builds/Linux-x86_64-icc --charm-arch mpi-linux-x86_64-icc cd builds/Linux-x86_64-icc/ make -j4 namd2 # Adjust value of j as desired to specify number of simultaneous make targets. </source> --Cmadill 16:18, 27 August 2009 (UTC)
Running Fortran
On the development nodes, there is an old gcc. The associated libraries are not on the compute nodes. Ensure the line:
module load gcc
is in your .bashrc file.


